axios ⭐
axios: ajax i/o system.
功能特点 :
- 在浏览器中发送 XMLHttpRequests 请求
- 在 node.js 中发送 http请求
- 支持 Promise API
- 拦截请求和响应
- 转换请求和响应数据
支持多种请求方式
- axios(config)
- axios.request(config)
- axios.get(url[, config])
- axios.delete(url[, config])
- axios.head(url[, config])
- axios.post(url[, data[, config]])
- axios.put(url[, data[, config]])
- axios.patch(url[, data[, config]])
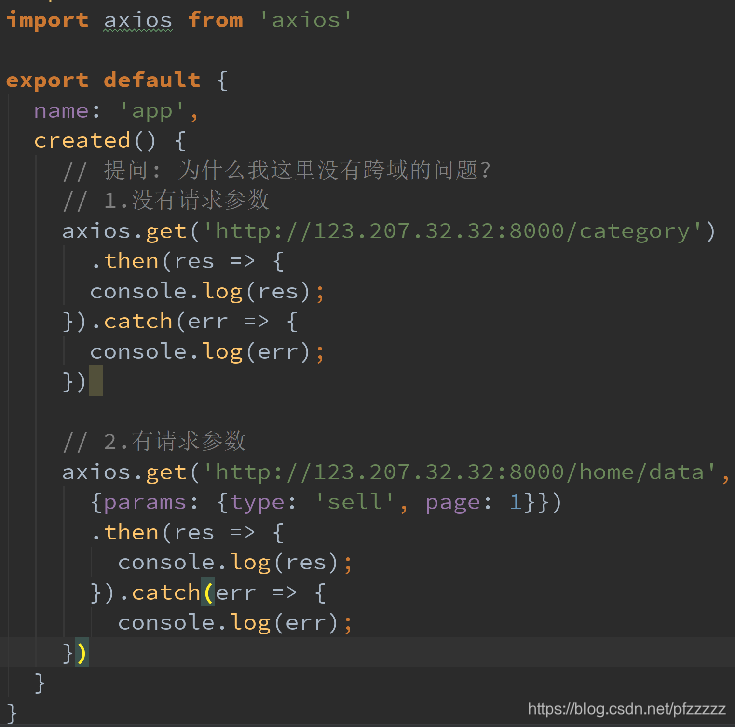
get 请求演示
发送并发请求
- 有时候, 我们可能需求同时发送两个请求
- 使用axios.all, 可以放入多个请求的数组. res[0],res[1] 得出结果
- axios.all([]) 返回的结果是一个数组,使用 axios.spread 可将数组 [res1,res2] 展开为 res1, res2
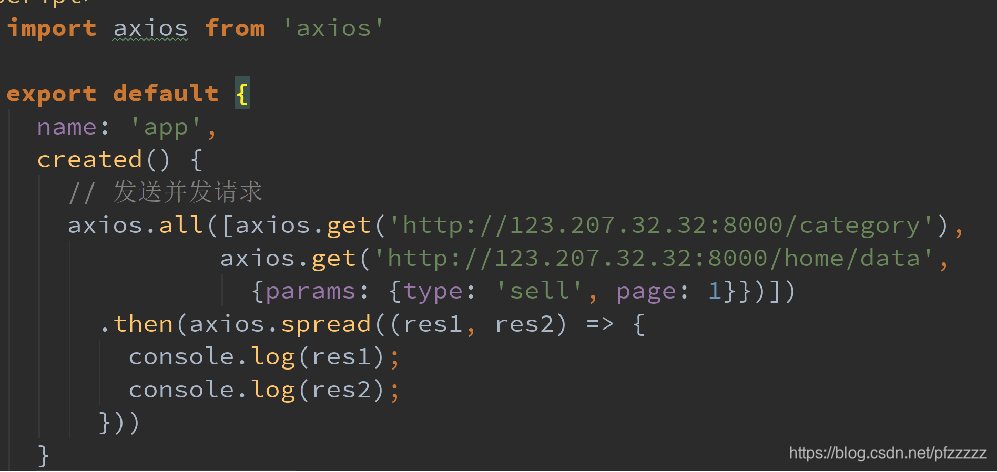
如果不使用 axios.spread 那就 用 最简单的数组方法得出结果: res[0],res[1]
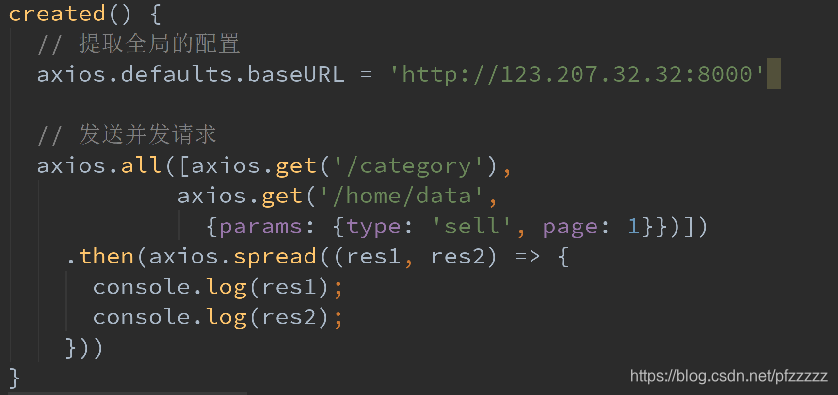
全局配置
在上面的示例中, 我们的BaseURL是固定的
事实上, 在开发中可能很多参数都是固定的.
这个时候我们可以进行一些抽取, 也可以利用axiox的全局配置
1
2
| axios.defaults.baseURL = ‘123.207.32.32:8000’�axios.defaults.headers.
post[‘Content-Type’] = ‘application/x-www-form-urlencoded’;
|
创建 axios 实例
- 为什么要创建axios的实例呢?
- 当我们从axios模块中导入对象时, 使用的实例是默认的实例.
- 当给该实例设置一些默认配置时, 这些配置就被固定下来了.
- 但是后续开发中, 某些配置可能会不太一样.
- 比如某些请求需要使用特定的baseURL或者timeout或者content-Type等.
- 这个时候, 我们就可以创建新的实例, 并且传入属于该实例的配置信息.

axios 模块化封装 ⭐
在实际开发过程中,需要对AJAX请求进行统一的封装,使其模块化,易于修改和操作。
所以,最好这样做,而不是直接在 组件内使用 axios 插件 ,那样后期修改整个 axios 时会及其麻烦
1
2
3
4
5
6
7
8
9
10
11
12
13
14
15
16
17
18
19
20
21
22
23
24
25
26
27
28
29
30
31
32
33
34
35
36
37
38
39
40
41
42
43
44
45
46
47
48
49
50
51
52
53
54
| import axios from "axios";
export function request(config) {
const instance = axios.create({
baseURL: 'http://152.136.185.210:8000/api/z8',
timeout: 5000
})
return instance(config)
}
|
1
2
3
4
5
6
7
8
9
10
11
12
13
14
15
16
17
18
19
|
request({
url:'/home/multidata'
}).then(res =>{
console.log(res)
}).catch(err=>{
console.log(err)
})
request({
url:'/home/multidata'
},res=>{
console.log(res)
},err=>{
console.log(err)
})
|
axios 拦截器
axios提供了拦截器,用于我们在发送每次请求或者得到相应后,进行对应的处理。
1
2
3
4
5
6
7
8
9
10
11
12
13
14
15
16
17
18
19
20
21
22
23
24
25
26
27
28
29
30
31
32
33
34
35
36
| import axios from "axios";
export function request(config) {
const instance = axios.create({
baseURL: 'http://152.136.185.210:8000/api/z8',
timeout: 5000
})
instance.interceptors.request.use(config => {
console.log(config);
return config
}, err => {
console.log(err);
})
instance.interceptors.response.use(res => {
return res.data
}, err => {
console.log(err);
})
return instance(config)
}
|